Updated: Where I discuss a simplified approach to development automation using make in AVR_C, add the ability to use Arduino tools.
Introduction#
The previous explanation provided the Makefile from Elliot Williams and can be viewed here. I have made several significant changes to the file since:
- moved the device programming setup to env.make at the root folder
- use one Makefile at the root folder then use “include ../../Makefile” in the file makefile, which is in each of the examples in the examples folder
- added a
DEPTHvariable to each local makefile (the one in the examples folder) - removed some of the targets to simplify the file
- added additional targets which help explain the make options, including make help
- Added two variables, which allow you to use either the Arduino toolchain or the avr-gcc toolchain, OS and TOOLCHAIN
Here are detailed instructions as to how to use make, the Makefile and env.make to configure and execute your development process.
Arduino IDE Comparison#
- As mentioned before, the Makefile controls the compile/link/load process for AVR C. If you execute the command make, with nothing else, it is the same as the verify command (checkmark) and make flash is the same as upload (right arrow) in the Arduino IDE.
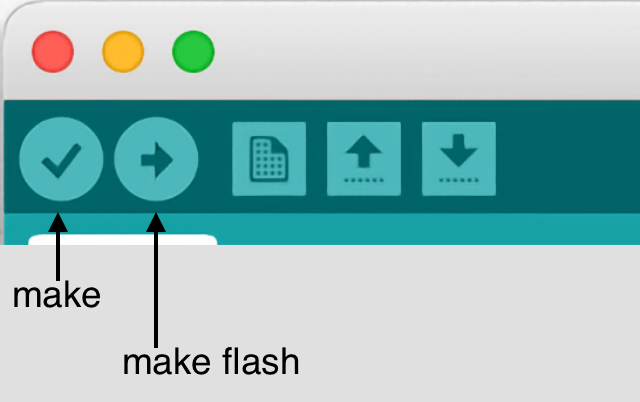
Arduino IDE and make commands
- The Arduino IDE uses Tools->Board and Tools->Port to define the board to be used and the port on which to program the board. In AVR C, the env.make file provides the same capability.
make Commands#
To make it easier to use and provide documentation, I added a help target to the Makefile. (A target is the nomenclature for make to use as its command structure. Normally, using make, you are using it to make a “target” file.) To use it, looks like this:
make help
make - compile only, Arduino verify
make flash - show size and flash to board, Arduino upload
make verbose - make flash with more programming information
make clean - delete all non-source files
make LIB_clean - delete all Library .o files
make env - print active env.make variables
Here is additional detail as to the commands above:
- make help - print the widely used available targets for AVR_C make
- make - This target is the same as Arduino verify. It will only compile the code. This is useful if you are in syntax debugging stage and know you won’t wish to upload code to the board.
- make flash - This target is the same as Arduino upload. It is the most common used target by far. It will show the program and data size, then upload the main.hex file to the board.
- make verbose - This target is the same as make flash, however, it provides much more information as to the upload process. This is helpful, when the upload process isn’t working and you need more information to debug it.
- make clean - This target will delete all non-source files. Use this to clean up the folder of all of the files created by make.
- make LIB_clean - This target deletes all Library .o files. This is REQUIRED, if changes have been made to your env.make variables. If you believe you have fixed a problem in your code, however, it doesn’t compile correctly, it is helpful to use this command along with make clean, to completely recompile your code. A simple way to do this is: (This set of commands are your friends, use them, when you have compilation problems.)
make clean && make LIB_clean && make flash- make env - If you have an issue with connecting to your board or compiling your code, it is helpful to see what make is actually using for its variables. This prints the active code block in your env.make file.
make env
MCU: atmega328p
SERIAL: /dev/tty.usbmodem4101
F_CPU: 16000000UL
BAUD: 250000UL
SOFT_RESET: 0
LIB_DIR: ../../Library
LIBRARY:
PROGRAMMER_TYPE: snap_isp
PROGRAMMER_ARGS: -P usb
TOOLCHAIN:
OS: mac
BIN:
TC3_RESET: 0

Source files: main.c ../../Library/analogRead.c ../../Library/analogWrite.c ../../Library/button.c ../../Library/delay.c ../../Library/digitalRead.c ../../Library/digitalWrite.c ../../Library/map.c ../../Library/pinMode.c ../../Library/readLine.c ../../Library/serialRead.c ../../Library/servo.c ../../Library/sysclock.c ../../Library/tinymt32.c ../../Library/tone.c ../../Library/uart.c ../../Library/unolib.c
Files used for make process#
makefile in each example (local makefile)#
Note the small “m” in the filename. This file is also known as the “local makefile” and consists of a two lines
DEPTH = ../../
include $(DEPTH)Makefile
The first line indicates the number of levels, this particular makefile is from the root folder. And it uses the number in the second line to find the main Makefile. This configuration enables the ability to have a single Makefile at the root folder AVR_C, simplifying make management. If you create a new folder for a new capability, you will need to add a copy of this specific file in the folder along with your main.c file.
This allows you to make a change to the Makefile and have it changed for every example. (Previously, I attempted to use a symbolic link is similar to an alias in macOS or shortcut in Windows. This worked well for MacOS and Linux, however, symbolic links are handled differently in Windows. This new approach works on all three operating systems.)
Makefile at root folder (main Makefile)#
Note the capital “m” in the filename. This Makefile controls all aspects of the development process of AVR C. It does so by automating the specific commands required to:
- Compile the source files (main.c etc)
- Link the source object files with the required object files from the Library (analogWrite(), avrlib, stdio etc)
- Create an executable file in the correct format (main.hex)
- Upload the executable file to the ATmega328P board
- Perform various clean up activites which delete the immediate compiled code, make clean or delete all of the compiled Library code make LIB_clean.
- Provide additional information such as size of code, make size or a listing file, make disasm.
The Makefile uses env.make to provide the required, local details to be successful.
env.make at root folder#
As I developed AVR C for multiple processors, multiple operating systems and different CPU’s, it became apparent I needed a more sophisticated system than the multiple targets approach used in the original Makefile. I switched to a specific file which wouldn’t be tracked by git, which would define all of the local requirements. Here is an annotated example block for the Uno R3 in the Arduino mode:
# Arduino UNO et al using Optiboot (standard Arduino IDE approach)
MCU = atmega328p
SERIAL = /dev/tty.usbmodem3101
F_CPU = 16000000UL
BAUD  = 250000UL
SOFT_RESET = 0
LIBDIR = $(DEPTH)Library
LIBRARY =
PROGRAMMER_TYPE = arduino
PROGRAMMER_ARGS = -F -V -P $(SERIAL) -b 115200
TOOLCHAIN =
OS =
TC3_RESET = 0
SOFT_BAUD = 28800UL
Update: OS and TOOLCHAIN#
Since Jan 2024, I added two new variables, OS and TOOLCHAIN. The former is used to identify which operating system and the latter identifies if you wish to use the Arduino toolchain. It can look like this for a Windows PC using the Arduino toolchain:
TOOLCHAIN = arduino
OS = windows
The two variables come after PROGRAMMER_ARGS. When specified above the make utility will use the Arduino toolchain from where it is installed in Windows. More detail here
Adding a new processor#
As I add processors or new boards, I adjust the parameters accordingly. When I need to make a change, I do it by switching blocks. For example, if I’m going to add a xplainedmini 328PB board, I’ll duplicate a block and make the changes to the new block. I’ll also comment out the old block. It would look like this:
# Arduino UNO et al using Optiboot (standard Arduino IDE approach)
# MCU = atmega328p
# SERIAL = /dev/cu.usbserial-0001
# F_CPU = 16000000UL
# BAUD  = 250000UL
# SOFT_RESET = 0
# LIBDIR = $(DEPTH)Library
# LIBRARY =
# PROGRAMMER_TYPE = arduino
# PROGRAMMER_ARGS = -F -V -P $(SERIAL) -b 115200
# TOOLCHAIN =
# OS =
# TC3_RESET = 0
# SOFT_BAUD = 28800UL


# Microchip 328PB Xplained Mini board
MCU = atmega328pb
SERIAL = /dev/tty.usbmodem4101
F_CPU = 16000000UL
BAUD  = 250000UL
SOFT_RESET = 1
LIBDIR = $(DEPTH)Library
LIBRARY =
PROGRAMMER_TYPE = xplainedmini
PROGRAMMER_ARGS =
TOOLCHAIN =
OS = mac
TC3_RESET = 1
SOFT_BAUD = 28800UL
Note the first line always needs to be a comment, it merely describes the block. And remember the easiest method to determining the port is to use the Arduino IDE, Tools->Port command to identify the port.
Adding a new folder or example in examples/#
If you wanted to add a new example folder, you would add your main.c file as you did before. And create a new file called makefile with this two lines in it
DEPTH = ../../
include $(DEPTH)Makefile
A note on speed and size#
The Makefile has two ways to compile the source code, with and without debug information. The method of doing so provides the following results when running examples/blink_avr:
//   or remove the delays and determine fastest blink is 2.02MHz w/ -Og -ggdb
//   or remove the delays and determine fastest blink is 2.68MHz w/ -Os -g
In other words, if you are looking to pick up a little bit of speed AND your program is completely debugged do the following in the Makefile:
|
|
- Comment line 44 (the line with -Og) by placing a “#” in front of it
- Uncomment line 46 (the line with -Os) by removing the “#” in front of it.
The code size might shrink and the speed might increase, as it did for this blink_avr example.